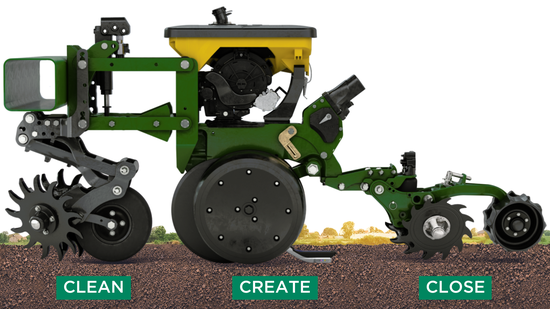
The 3 C's of Emergence
- Clean: Remove as much residue as possible without removing soil and maintain row unit ride quality.
- Create: Create a furrow with integrity that will survive long enough for a seed to make it to the bottom of the trench before being easily destroyed.
- Close: Properly close the trench and ensure 100% seed-to-soil contact while managing the soil density above the seed.
It’s no surprise the topic of even emergence comes up every season: even emergence is easy to get wrong, hard to get right. Before we dive into how to manage emergence from cleaning to closing, let’s refresh on the main factors needed for seeds to germinate: moisture, soil temperature above 50°, and oxygen. These three needs of the seed are extremely difficult to manage. Actually, if we think through all the variables that affect emergence, it can get a bit overwhelming. That doesn’t change the fact that even emergence is the foundation to high yield. Data from the AGCO Crop Tour that was done in 10 corn plot locations across 7 states found that for every hour delay in emergence, a bushel (.94 bu/a) was lost. Let’s tackle emergence and gain back those lost bushels!
Step 1 – Clean
Goal #1: Remove as much residue as possible without removing soil while maintaining row unit ride quality.
The foundation of creating the ideal seed environment for emergence is to create a clean path. Here are a few of the negative agronomic impacts of having residue near a seed and the roots of a young plant:
- Residue wicks moisture away from the soil which delays germination.
- Residue acts as insulation and prevents the soil around the seed from warming up. In fact, daytime temperature around residue is 15°-20° cooler versus no residue.
- When soil warms up to 60°, residue starts to decay and excrete toxins which can cause seedling blight. Seedling blight causes the seed or seedling to rot and not germinate.
Also, nutrient deficiency starts to occur when soil warms up to 60°; microbial activity immobilizes available nitrates and phosphates for energy, creating competition with young roots and plants for available nutrients.
To create a clean path for your row unit to run on, you need your row cleaner working at peak performance. Below are 5 ways to optimize row cleaner performance:
- Flotation: The row cleaner needs to be able to be engaged with the surface without gouging too deep and moving too much soil. You want flotation across all conditions.
- Consistent Engagement: Row cleaner wheels need to be engaged with the ground 100% of the time to do a good job of row cleaning. Sometimes lift pressure is needed to counteract the weight of the row cleaner in light soils, but it can also cause the row unit to bounce and disengage from the ground.
- Adjustable Tine Depth: No matter the environment, adjustable tine depth is important. Depending on the field environment your row cleaner is running in, having more aggressive tine engagement will improve your cleaning, but in other field conditions, you might need to shallow up.
- Cab Adjustability: Typically, you don’t know optimal cleaning settings until you’re at full planting speed out in the field. The ability to make down-pressure changes from the cab as you look out the back window is ideal.
- Row Unit Ride: Our field studies have shown that row-unit mounted row cleaners negatively affect row unit ride. Row unit bounce increases by 3x compared to no row cleaner engaged. The bouncing also increases the variability that your down-pressure system needs to counteract.
Reveal is frame-mounted, removing its impact on the row unit. With its own internal gauge wheel, Reveal precisely controls the depth of the cleaning tines to create a consistently clean and ideal seeding environment for even emergence to occur. Our studies have shown an increase of +5.6% in Good Ride when Reveal is used compared to other row-unit mounted row cleaners. Utilizing SmartFirmer, a seed-firmer sensor that measures the furrow, we saw an increase of +2.9% in Clean Furrow value with Reveal.
Step 2 – Create
Goal #2: Create a furrow with integrity that will survive long enough for a seed to make it to the bottom of the trench before being easily destroyed.
Once the furrow area is clean of residue, the next step is the creation of the furrow. We know the main job of the row unit is to create a furrow in the soil, at the depth you choose, and drop a seed in the furrow. Sounds simple, but there are 3 big things to manage in this process:
- Trench Width: Check your disk blade's distance to ensure you create a furrow wide enough for your seed to be delivered. The width of your seed tube guard also affects trench width, so make sure it isn’t worn.
- Seed Depth: Once your trench is wide enough for proper seed placement, the next step is to decide depth of your seed based on moisture. For almost all crops, extensive studies have shown that optimal furrow moisture is 30% or higher to achieve ideal germination. SmartFirmer can measure the seed's available moisture value–Furrow Moisture. Since moisture lines vary throughout the field, SmartDepth allows you to make depth adjustments in 1/10th inch increments, right from the cab, so you can get your seed depth exactly where you need it. While getting into moisture is important, there are tradeoffs to planting too deep or too shallow–the key is to try to get to that 30% moisture line, no more and no less.
- Proper Downforce: Your unique soil conditions are a big factor when setting downforce. How do you react as your conditions change when it comes to setting downforce? Keep furrow structural integrity in mind. That means you have a clean, open trench to drop seed into that is uniform, consistent, and not falling apart on you. The video below walks through examples of too heavy, too light, and ideal downforce.
Step 3 – Close
Goal #3: Properly close the trench and ensure 100% seed-to-soil contact while managing the soil density above the seed.
We’ve reached the final step in managing emergence. Could you imagine planting an entire field without closing the trench? It’s safe to say it’s an important step. Once seed is placed, the trench needs to be destroyed and returned to its original state. But in that process, it's important to have consistent density around the seed for moisture to move in and roots to develop unobstructed.
In the video below, agronomist Cory Muhlbauer, shares the best way to evaluate a closing system, including air pockets and soil density. He’s using a FurrowFinder – you can order one here if you’d like to have one!
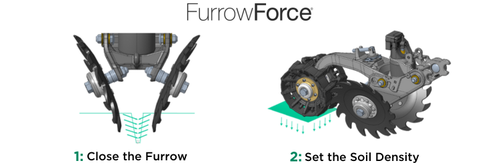
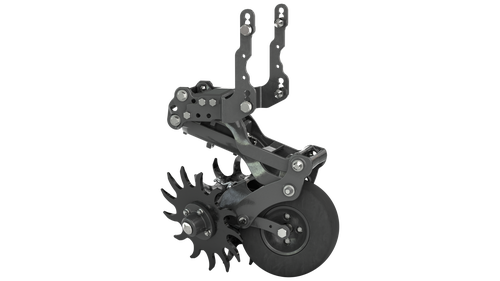
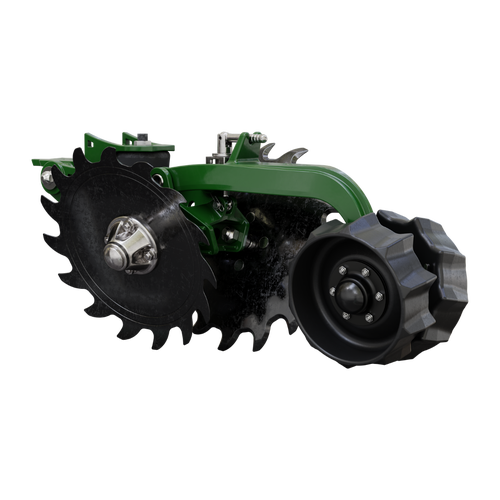
We’ve learned through the years of planter research that a closing system can’t do it all with a single set of wheels. FurrowForce separates the closing process into two stages. Stage 1 is notched wheels that you adjust the width and the depth to optimize the closing performance to fracture the sidewalls and close the furrow while leaving the soil loose for stage 2. Stage 2 is where you set soil density to retain moisture with rubber stitch wheels. The 2nd stage wheels also set the depth of the 1st stage wheels. The pressure and weight applied are controlled from the cab to ensure that the first stage is closing at the depth you set and the 2nd stage is firming soil to your desired density.