Panorama’s Planning mode provides a powerful, user-friendly way to turn field data into actionable plans for future field operations. This guide walks through how to use available map layers to create precise boundaries and prescriptions that help optimize inputs and improve field performance.
Prescriptions can be created based on any map layer present for that field. The type of map layers that populate within Panorama is dependent on the data captured by the 20|20 or other monitor data that was uploaded directly to Panorama.
For example, a planter outfitted with SmartFirmers will include CEC, clean furrow, furrow moisture, furrow temperature, organic matter, and uniform furrow map layers when data is sent to Panorama.
How to Auto Create a Prescription
Let’s walk through how to create a variable rate seeding prescription in Panorama based on the Elevation map layer that can be found under the Equipment-Wide section.
The number of elevation zones populating on the map determines the number of seeding ranges within the prescription. You can customize the number of zones by clicking Edit at the bottom of the Legend tab. Then click Add Step or Remove Step until you have the desired number of zones within the prescription.
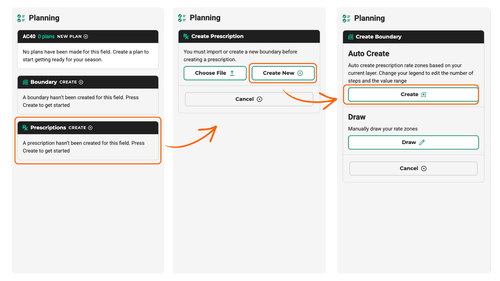
To start the prescription-making process, select the Planning tab at the top of the screen. From there, select Create within the Prescriptions box and then Create New on the next prompt. If no boundary exists for the field, you’ll first be prompted to either create a new boundary or upload an existing boundary.
Creating a Boundary
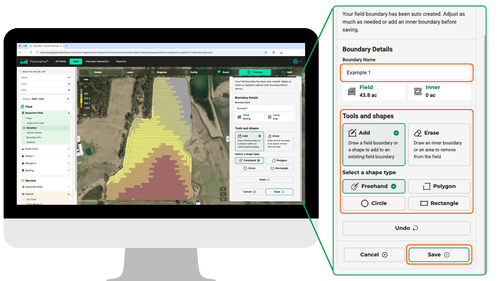
There are two options for boundary creation: Auto Create or Draw. The Auto Create function will automatically create the boundary based on previous map coverage for the selected field. The Draw function enables you to manually draw the field boundary.
For this example, we’ll select Auto Create.
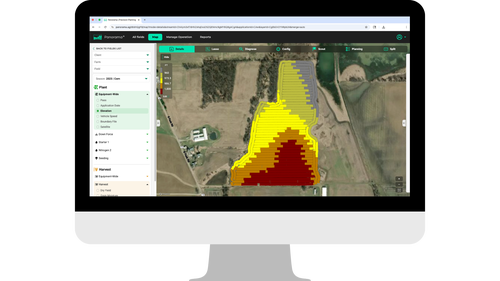
First, add a boundary name, then use the Add or Erase buttons to add or remove shading from the map to ensure all desired acreage is included in the boundary. It’s important to review the field closely and ensure that no unintended internal boundaries exist.
For example, in the image below, there is a small unshaded section in the headlands where there was no coverage in the original map layer. The map should be shaded where you want to actively apply coverage as the 20|20 will swath off by controlling to the boundary. The 20|20 will turn vDrives on or off depending on where you are in relationship to the boundary.
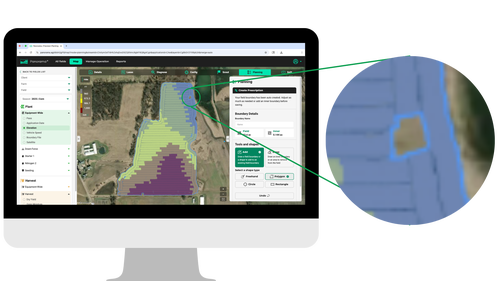
Helpful Hint: In the above field, under the Boundary Details section, the Field Boundary shows 43.6 ac while the Inner Boundary shows 0.144 ac. No internal boundaries were intended in this field; therefore, the Inner Boundary should show 0 ac. Acreage populating for the Inner Boundary in this instance tells us that there is a gap somewhere that needs to be shaded.
To remedy this, simply select Add, then select a shape to draw around that area. A series of shape types can be used to add or remove shading: freehand, polygon, circle, or rectangle.
Now that all intended acreage is included in the boundary, click Save.
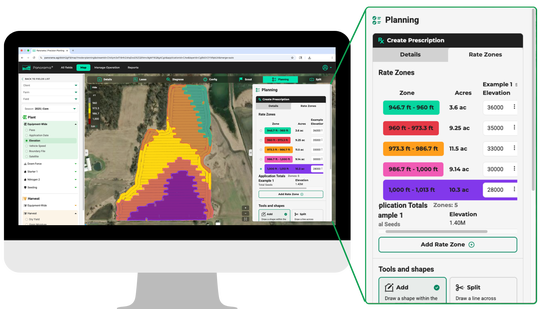
Creating a Prescription
Once a boundary is created, you can now move forward with creating a prescription. Similar to boundary creation, you can either Auto Create or Draw your prescription zones.
The Auto Create function automatically creates the rate zones based on the current map layer. Remember, you can change your legend to edit the number of steps and the value range. For an Auto Create prescription, select Create, then you will be prompted to add the units you wish to create the prescription from. Since the intent for this example is to variable rate corn based on elevation, we’ll select Seeds/Ac.
Then, give the prescription a name and any attributes you wish to associate it with.
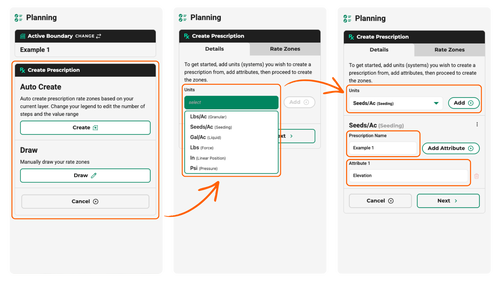
After selecting Next, you will assign Rate Zones accordingly. Simply input the seeds/ac value for each respective zone. A series of tools are available if any zones need to be adjusted. Add, Split, or Reassign zones until you have the intended zones.
Once your prescription is saved, it will now populate in the prescriptions list in the 20|20.
Add to a Plan
Both boundaries and prescriptions can be added to a plan. Plans are a list of field activities for the individual field and a great tool for those not as familiar with the 20|20 or those simply looking to streamline the process. On the active field page on the 20|20, you will see a list of plans that are available. Once activated, it will activate the boundary, all prescriptions within the plan, and the crop that you’ve assigned to the pass.
Panorama’s planning tools make prescriptions an easy, repeatable way to make the most of your field data. With prescriptions tailored to each field's needs, you can apply costly inputs with more precision and give each acre its best opportunity to win.